转载请注明出处:https://oldnoop.tech/c/123.html
设置eclipse的web开发环境
1.安装tomcat
解压缩安装apache-tomcat-7.0.79.zip
2.
eclipse配置jsp开发环境
配置server
Window->Preferences->
Server->Runtime Environment
配置jsp
Web->JSP Files->Encoding 设置为UTF-8
3.新建web工程
New->Project->Web->Dynamic Web Project
在弹出的对话框中Project Name填写工程名字helloworld
Target Runtime 选择在第2步中配置的Server Runtime的Tomcat服务器
Dynamic Web Module Version选择2.5(servlet使用2.5版本)
Configuration,点击Modify,检查在Project facet下面java是否选择的是1.7或1.8
4.web工程结构
|- src
|- WebContent
|- WEB-INF
|- lib
|- web.xml
|- .classpath
|- .project
5.在eclipse中将web工程启动,发布到tomcat
工程->右键->Debug as ->Debug On Server->Next->Finish
在Servers视图有一个应用,是Debugging,表示应用起来了,
在Console视图没有报错信息,没有[严重]表示启动正常
在左边的Project视图中,出现了Servers这个工程,Servers下面有一个Tomcat目录,里面有一个server.xml
里面配置了端口,使用哪个web工程,以及访问的根路径
6.编写jsp页面测试
选中web工程的WebContent目录,新建一个jsp文件,命名为index.jsp
在body中编写hello world!
路径->http://主机:端口/web根路径/
URL中的web根路径和工程中的WebContent对应
web根路径
查看Servers工程中的tomcat目录下面的server.xml中的<Context>节点
比如:
<Context docBase="helloworld" path="/helloworld" reloadable="true"
source="org.eclipse.jst.jee.server:helloworld" />
docBase="helloworld" 指定用哪个web工程
path="/helloworld" 指定web在访问时候使用的url的根路径
说明:
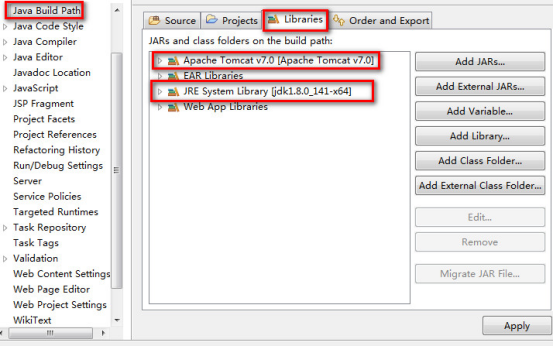
1.
Eclipse中运行的web项目的依赖包,一般需要JRE 和Server Runtime
可以 点击 工程 -> 右键 -> Build Path 进行查看
2.
出现端口占用问题导致eclipse中web项目启动不了
运行tomcat目录下bin/shutdown.bat
服务器(数据库服务器,web服务器)启动都会占用一个端口,如何该端口已经被占用,服务器起不来
服务器起来之后,会一直运行
3.
直接访问web根路径不带具体的资源路径,
比如
http://localhost:8080/helloworld
实际会访问
http://localhost:8080/helloworld/index.jsp
默认是 找web.xml中的<welcome-file-list>中的文件
<web-app xmlns:xsi="http://www.w3.org/2001/XMLSchema-instance"
xmlns="http://java.sun.com/xml/ns/javaee"
xsi:schemaLocation="http://java.sun.com/xml/ns/javaee
http://java.sun.com/xml/ns/javaee/web-app_2_5.xsd"
id="WebApp_ID" version="2.5">
<display-name>helloworld</display-name>
<welcome-file-list>
<welcome-file>index.html</welcome-file>
<welcome-file>index.htm</welcome-file>
<welcome-file>index.jsp</welcome-file>
<welcome-file>default.html</welcome-file>
<welcome-file>default.htm</welcome-file>
<welcome-file>default.jsp</welcome-file>
</welcome-file-list>
</web-app>
打war包部署
Eclipse中 点击 工程 -> 右键 -> Export -> WAR File ->
