转载请注明出处:https://oldnoop.tech/c/174.html
缓存的基本思想
现在一般提缓存,最多的就是针对数据库查询的缓存
以此为例,就是查询数据的时候,
先从缓存查找,如果没有找到,再到数据库查找,然后放到缓存,
下一次再查的时候,因为已经放缓存了,直接从缓存取就可以,不再从数据库查找了
缓存的麻烦之处
数据库和缓存双写不一致
当数据库更新了,要同步更新缓存,这个时候,直接清除缓存就好了
1.数据更新了,数据不一定再次被查询,可能不用缓存了
2.缓存的数据,是经过很多数据合并计算出的,这个时候,更新缓存代价很高,清除缓存代价要低很多
3.清除缓存后,再次查询,就会重新从数据库再次查询
springboot使用ehcache
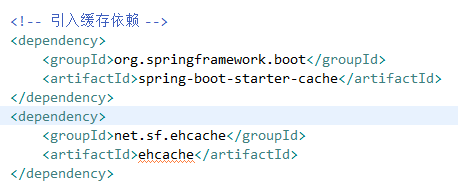
添加依赖

配置ehcache
修改application.properties
spring.cache.type=ehcache
spring.cache.ehcache.config=classpath:ehcache.xml
编写ehcache.xml配置文件,放到src/main/resources下即可

在启动类加注解@EnableCaching,开启缓存
使用缓存注解
@Cacheable,
可以指定三个属性,value、key和condition
value指ehcache.xml中配置的缓存名称,key是缓存的key,condition是缓存的条件
一般方法要有返回值, 缓存 方法的返回值
(如果是update方法,update也返回值,就可以使用这个注解)
如果缓存的key存在,就不执行目标方法
@CacheEvict
清除缓存,一般用在数据被修改的时候,删除或者更新
具有的属性 value,key,beforeInvocation,
beforeInvocation是否在目标方法执行之前,清除缓存,默认是之后,值为false
@CachePut
和@Cacheable类似,区别是,不管缓存的key是否存在,都会执行目标方法
@Caching
可以组合使用多个注解
在目标方法加注解
//根据账号查询缓存
//使用账号作为缓存的key,返回值类型Member作为缓存的value
@Cacheable(value="memberCache",key="#account")
public Member findByAccountCache(String account){
return accountMapper.findUserByAccount(account);
}
//更新数据库的时候
//直接清除缓存,下次会重新从数据库取
//dbMember是旧数据,username,email,phone都可以作为账号,
//member是新数据
//使用了Caching组合多个注解
@Caching(
evict = { @CacheEvict(value="memberCache",key = "#member.id", beforeInvocation = true),
@CacheEvict(value="memberCache",key = "#oldMember.username", beforeInvocation = true),
@CacheEvict(value="memberCache",key = "#oldMember.email", beforeInvocation = true),
@CacheEvict(value="memberCache",key = "#oldMember.phone", beforeInvocation = true)
})
public void updateMemberCache(Member oldMember, Member member){
memberMapper.updateByPrimaryKeySelective(member);
}
//根据id查询缓存
//使用id作为缓存的key,返回值类型Member作为缓存的value
@Cacheable(value="memberCache",key="#id")
public Member getByIdCache(Long id){
Member DBmember = memberMapper.selectByPrimaryKey(id);
return DBmember;
}
使用spring缓存注解的问题
加了缓存注解的方法(假设方法A),如果直接被使用,缓存是生效的
但是,该方法,被本类的其他方法(假设方法B)所调用,这个时候,需要注意,
在方法B中直接使用方法A,方法B是由AOP的代理对象调用,
但是这时方法A不是由代理对象调用,缓存失效,
需要使用AopContext.currentProxy()拿到代理对象去调用方法
同时,还需要配置exposeProxy为true, 可以在启动类上加注解
@EnableAspectJAutoProxy(exposeProxy = true)
举例说明:
//根据账号查询缓存
//使用账号作为缓存的key,返回值类型Member作为缓存的value
@Cacheable(value="memberCache",key="#account")
public Member findByAccountCache(String account){
return accountMapper.findUserByAccount(account);
}
public Member login(Member m) {
//这里直接调用findByAccountCache,不是AOP的代理对象调用方法,缓存不生效
//Member DBmember = findByAccountCache(m.getAccount());
//通过AopContext去拿到当前代理对象,用代理对象去调用方法,缓存才生效
MemberServiceImpl proxy = (MemberServiceImpl) AopContext.currentProxy();
Member DBmember = proxy.findByAccountCache(m.getAccount());
//省略部分代码...
}
AopContext
贴上部分主要代码,一目了然, 使用了ThreadLocal
public abstract class AopContext {
private static final ThreadLocal<Object> currentProxy =
new NamedThreadLocal<Object>("Current AOP proxy");
public static Object currentProxy() throws IllegalStateException {
Object proxy = currentProxy.get();
if (proxy == null) {
throw new IllegalStateException(
"Cannot find current proxy: Set "
+ "'exposeProxy' property on Advised to 'true' to make it available.");
}
return proxy;
}
}
